How to perform Dirac Live Calibration on NAD products?
2708 Views |
** Download Program Dirac Live
Dirac Live® allows you to analyze the acoustic characteristics of speakers and your room to calibrate the NAD system and reproduce sound as intended. This article discusses the procedure to:
Set up Dirac Live for supported NAD products.
Achieve enhanced sound clarity, accurate imaging/staging, more prominent sweet spot, more profound and tighter bass.
Dirac Live calibration can be performed on the following NAD products only:
C 389 – HybridDigital DAC Amplifier
C 399 – HybridDigital DAC Amplifier
C 658 – BluOS Streaming DAC
C 3050 – Stereophonic Amplifier
C 3050LE – Stereophonic Amplifier
M10 – BluOS Streaming Amplifier
M10 V2 – BluOS Streaming Amplifier
M17 V2 – Surround Sound Preamp Processor
M17 V2i – Surround Sound Preamp Processor
M33 – BluOS Streaming DAC Amplifier
M66 – BluOS Streaming DAC-Preamplifier
T 758 V3 – A/V Surround Sound Receiver
T 758 V3i – A/V Surround Sound Receiver
T 777 V3 – A/V Surround Sound Receiver
T 778 – A/V Surround Sound Receiver
Note: This article aids in performing calibration using a Windows/Mac OS Dirac Live Application. The steps to perform calibration in Android or iOS devices may vary slightly.
Prerequisites
- Windows/macOS computer (or) Android/iOS device – connected to the home network (with internet)
- Download and install Dirac Live applicationa).
- Download and save the required NAD Target Curve (from the Software Download section) to a local folder on the computer.
- (Optional) Mini or full-size tripod mic stand
- BluOS upgrade kit (included with NAD product package)
- Dirac hardware kit (included with NAD product package) containing the following:
2. Mono to stereo minijack adapter
3. Microphone
Setup NAD Product
1. Finalize the location of the speakers and connect them to the NAD product.
2. Connect and configure all required sources in the NAD product.
3. Install the BluOS upgrade kit in the rear USB port of the NAD product.
Note: To reduce the radio interference of the Wi-Fi signals, use the Wi-Fi extension cable to connect the Wi-Fi USB Adapter to the USB Hub, or (if available) connect the NAD product to the home network using the ethernet port.
Firmware Upgrade
1. Connect the (BluOS enabled) NAD product to the home network.
2 .Ensure the NAD product has the latest version of BluOS.
Note: If you calibrate a 2-channel Stereo NAD product (not a Home Theatre System), skip step 3 and proceed to the Microphone Setup section.
3. Ensure the NAD product has the latest version of chassis firmware.
Room Conditions
- Ensure to set up the room identical to actual listening conditions (curtains closed, furniture arrangement, and such).
- Turn off HVAC, Fans, and such to avoid any background noise.
Speaker Configuration
Perform the following steps to configure the Speaker Levels and Speaker Distance:
1. In the NAD product's On-Screen Display (OSD) – Main Menu, select Setup Menu.
2. Select Speaker Setup. The Speaker Setup screen is displayed.
3. Set the below options as follows:
- .Speaker Configuration – Adjust the Speaker Size and Crossover. Small/80Hz is the THX Standard. Refer to the speaker manufacturer manual for recommended crossover settings. Set the non-functioning speaker positions to Off.
- Speaker Levels – Use built-in test tones and SPL meter (or SPL mobile app) to set the speaker levels at 75dB (or to the nearest value).
- Speaker Distance – Measure and enter the distance of each speaker's primary tweeter from the primary listening position.
Microphone setup
Connect the microphone to the NAD product or computer (Local system).
Connect mic with NAD product (recommended)
1. Assemble the Dirac hardware kit and connect it to a USB port on the BluOS upgrade kit (installed on the NAD product).
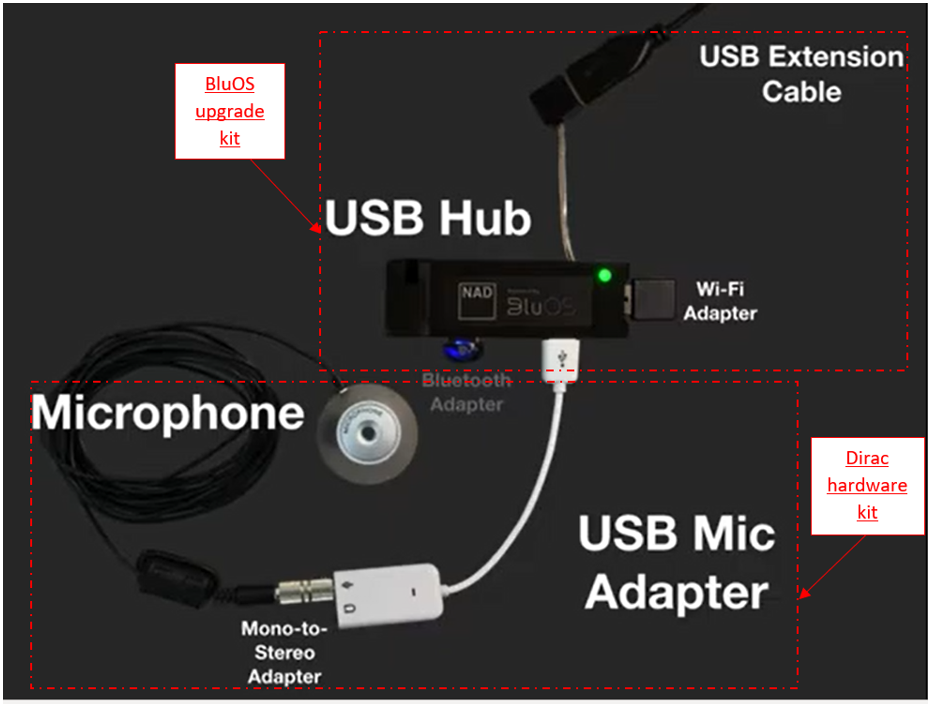
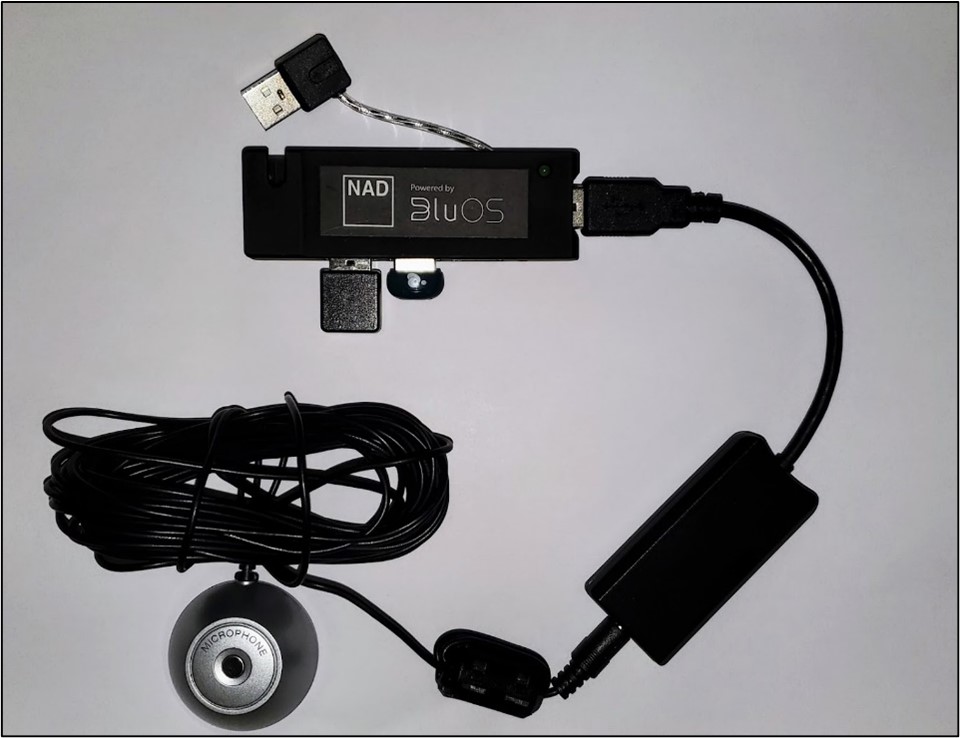
Note: Certain NAD products ship with a single USB to 3.5 mm mono adapter instead of the additional mono to stereo adapter. In that case, connect the microphone directly to the 3.5mm mono USB adapter.
Download and save the corresponding Mic Corrections(.txt) file (from the Software Download section) to a local folder on the computer.
Connect mic with Local System
Alternatively, you can also connect the Dirac hardware kit assembly to the computer. However, you are required to configure the computer's microphone settings priorly.
Complete the microphone setup before launching the Dirac Live application to avoid communication errors with the microphone.
Tip: Mount the Microphone on a tripod stand for better measurements. The microphone should always point up (facing the ceiling) with no source of reflection.
Note: If you are using a microphone not supplied by NAD, ensure it is Dirac Live certified and download the mic correction file from the manufacturer's website.
Dirac Live calibration
1. Launch the installed Dirac Live application on the computer. Dirac Live scans and displays the supported NAD product connected to the home network.
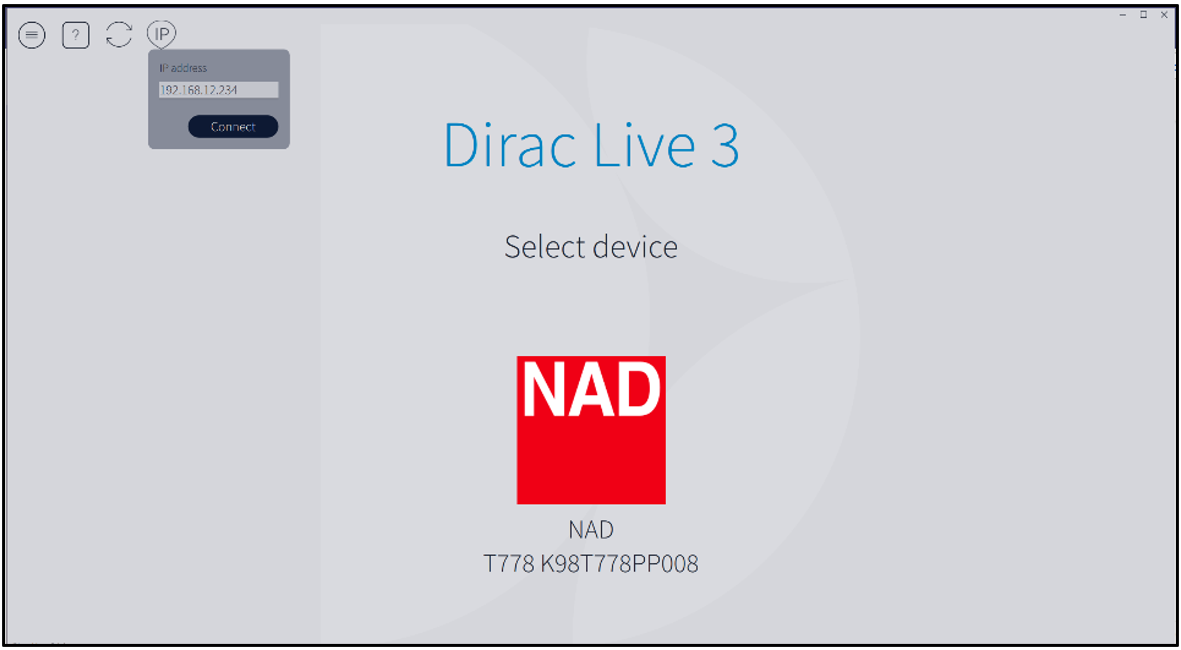
2. Select the NAD product. The Select Recording Device screen is displayed.
Note: If the NAD product is not displayed, select the IP icon in the upper left corner, manually enter the IP address of the NAD product, and select Connect.
3. Select the recording device configured in the Microphone Setup section.
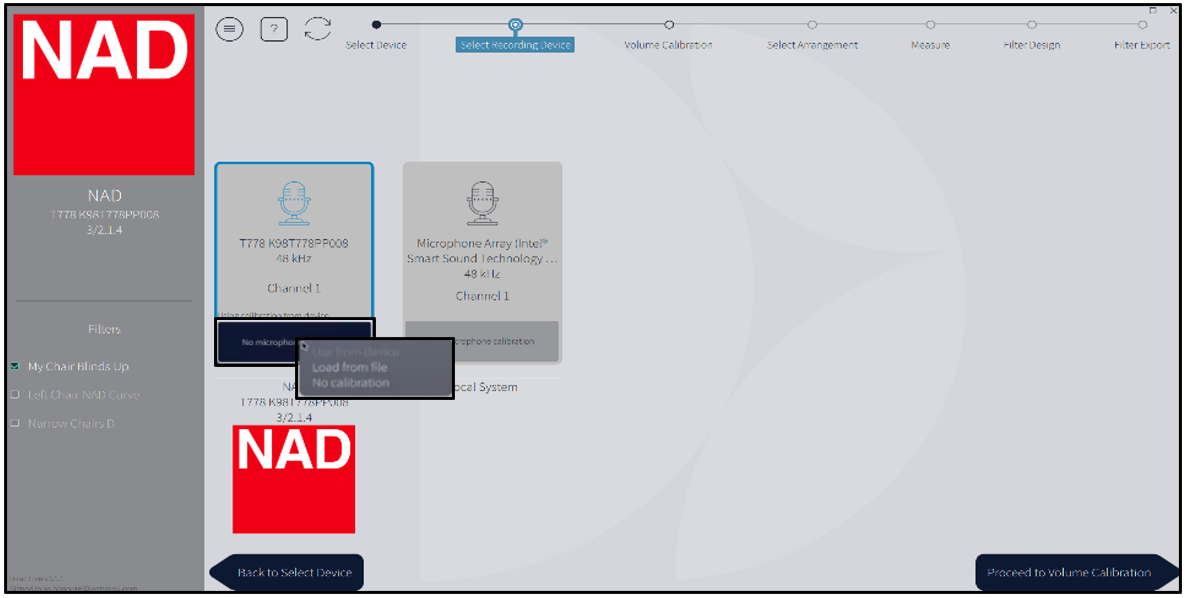
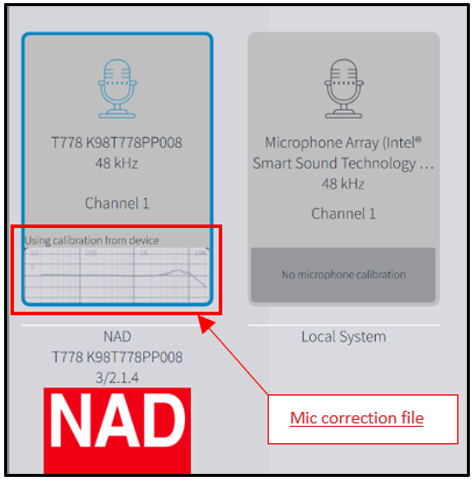
4. On the selected microphone, click No microphone calibration > Load from file. A browse window is displayed.
5. Upload the Mic Correction file that you saved in the Microphone Setup section.
6. Click Proceed to Volume Calibration. The Volume Calibration screen is displayed.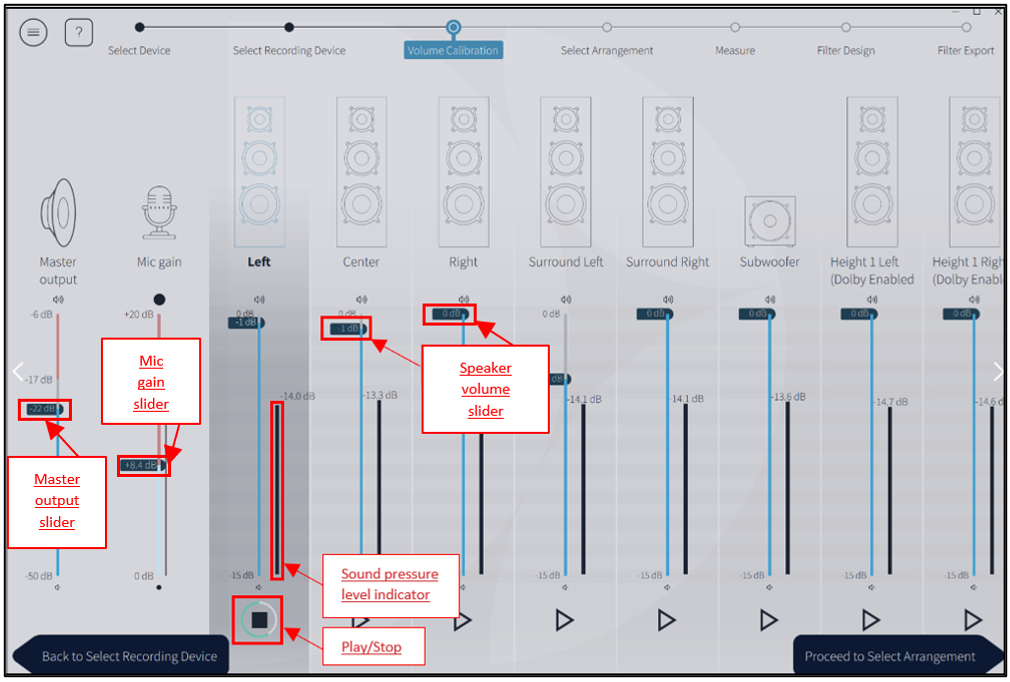
7. Place the microphone facing the ceiling at the listening focal point (sweet spot).
8. In the Dirac Live application, adjust the Mic gain slider to 0 dB.
9. Adjust the Master output slider to a lower volume setting to avoid damage to ears or speakers.
(You can also consider the Mic gain and Master output as a Signal-to-Noise ratio setting)
10. Click Play displayed below the first speaker (Left). The selected speaker plays a test tone and is measured using the sound pressure indicator level displayed adjacent to the speaker volume slider.
11. Adjust the Master output slider (only for the first test speaker – Left) until the first test speaker's sound pressure indicator level ranges between -15 dB to -13 dB.
12. Click Stop to stop the test tone.
13. Click Play on the next test speaker (Center).
14. Adjust only the selected speaker's volume slider until the selected test speaker's sound pressure indicator level ranges between -15 dB to -13 dB. Then click Stop.
15. Repeat Steps 13 and 14 for all remaining speakers.
Note: If available, use the physical volume control on the subwoofer instead of the subwoofer volume slider on the Dirac Live application.
16.Click Proceed to Select Arrangement. The Select Arrangement screen is displayed.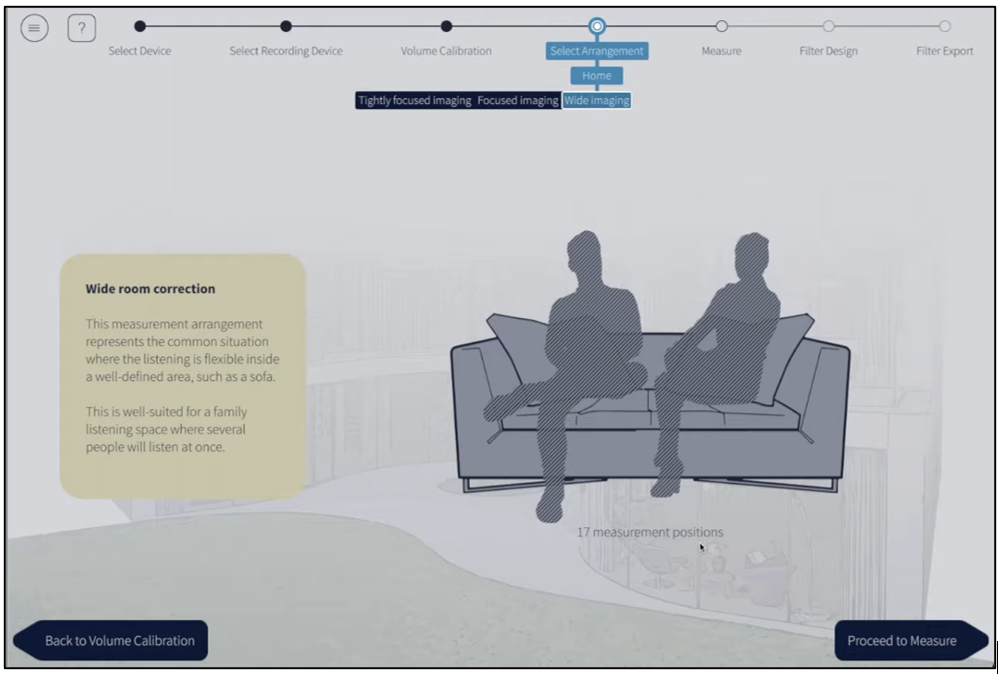
17.Select the required seating arrangement:
Tightly focused imaging – 9 measurement positions arrangement, suitable only for a fixed listening area (1 listener in a single-seater chair/sofa).
Focused imaging – 13 measurement positions arrangement, suitable for a fixed listening area but with a degree of flexibility (2 or 3-seater sofa)
Wide imaging – 17 measurement positions arrangement, suitable for a large listening area with multiple listeners
18.Click Proceed to Measure. The Measure screen is displayed
19. Ensure the microphone is still in the listening focal point (sweet spot) facing the ceiling.
Note: The sweet spot should correspond to the Main position indicated in the graphical representation on the Dirac Live application.
Tip: This first position is critical. Dirac's all impulse (phase/timing) fixes performed are based on the first signal sweep.
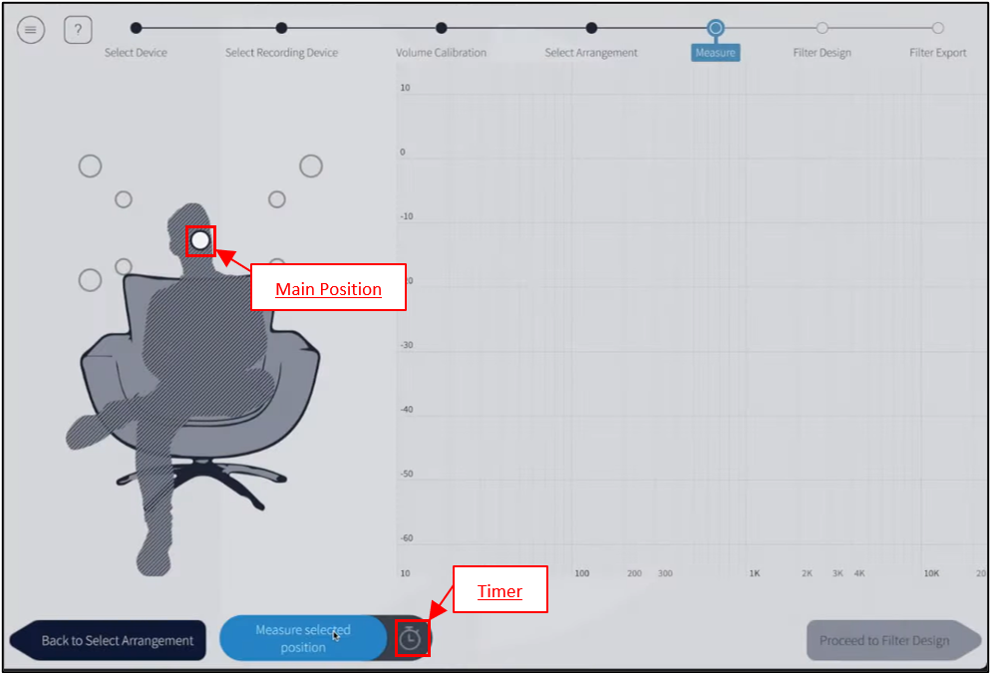
20. Click Measure selected position to collect a set of measurements. Selecting Measure selected position plays a sweep in each speaker, with a final additional sweep in the first speaker.
Note: Click Timer to apply a delay between 2 to 15 seconds before commencing the measurement. Selecting Timer allows you time to leave the listening area to avoid any interference in the line of sight of the microphone.
21. Move the microphone (facing ceiling) to the NEXT indicated position and click Measure next position. Repeat this step for all remaining positions.
Note: If there are any external disturbances or noise during measurement, select the position, click Clear data for position, and click Re-measure selected position.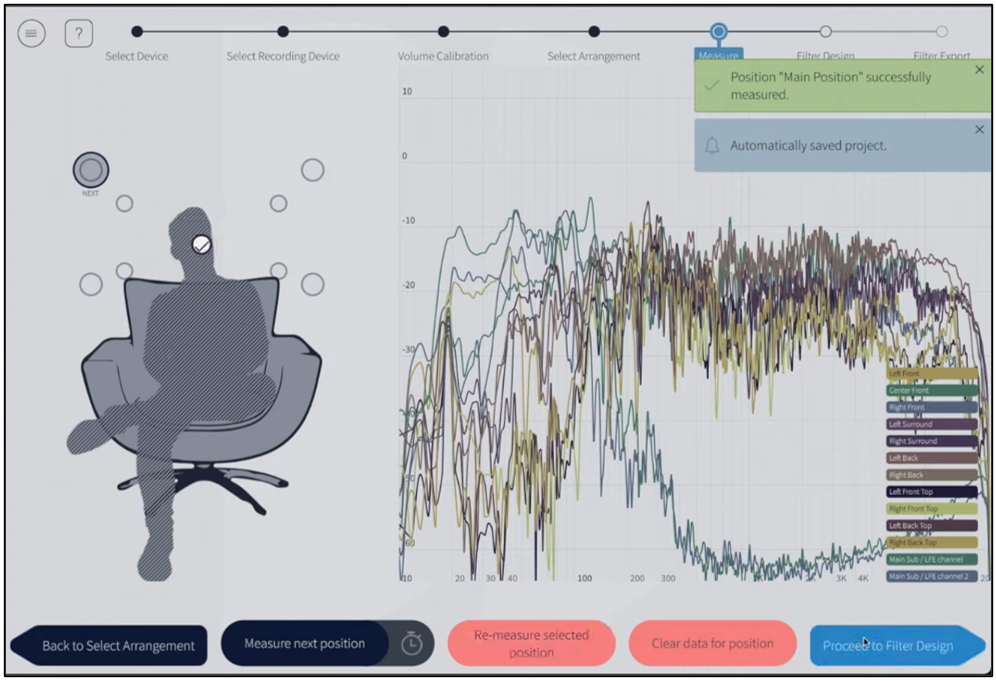
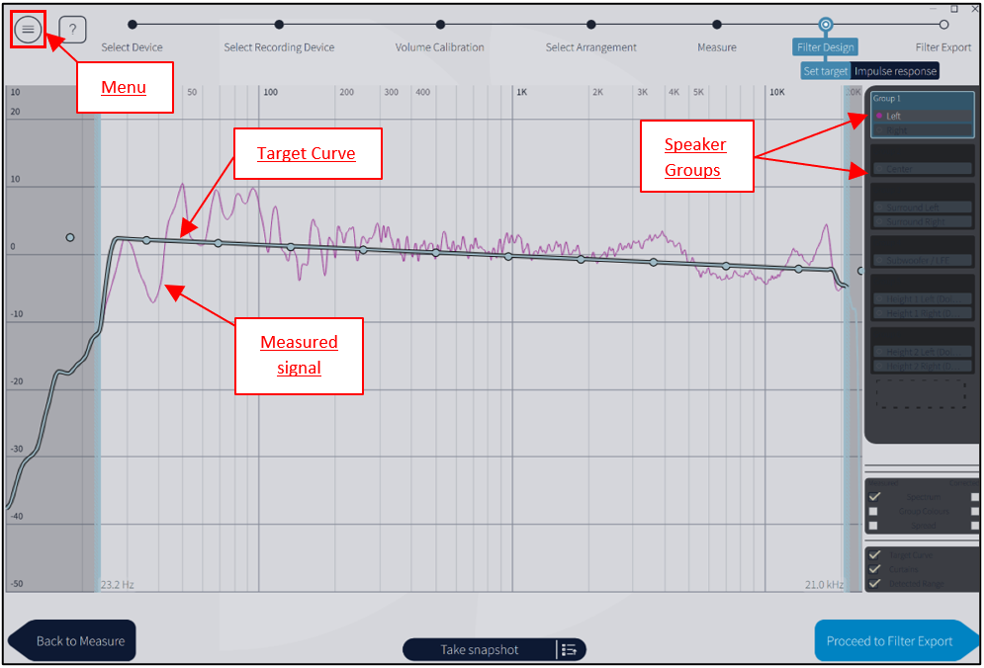
22. Click Proceed to Filter Design and select Set target in the upper right corner. The Filter Design screen appears, and it illustrates each speaker's average frequency response before and after Dirac Live calibration is applied. It groups the speakers with similar attributes.
Note: You can adjust every aspect of the filter curve. However, this is recommended only for users with advanced knowledge of Dirac and room acoustics.
23. Click Menu in the upper left corner and select Save Project.
Note: Use this saved project as a reference for future measurements of the same room.
24. Click Menu and select Load target curve.
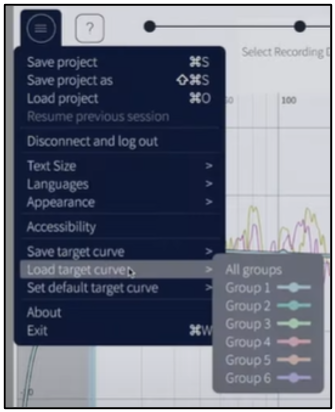
25.Select the required speaker group. A browse window is displayed.
26. Select the NAD Target curve saved in Prerequisites.
27.Repeat Steps 24 and 25 for all remaining speaker groups.
Note: Do not apply the NAD Target curve for the subwoofer group to avoid increasing bass loudness.
28. Click Proceed to Filter Export.
29. Select a slot and enter the required Name and Description.
Note: NAD products can store up to 3 Dirac filters (slots).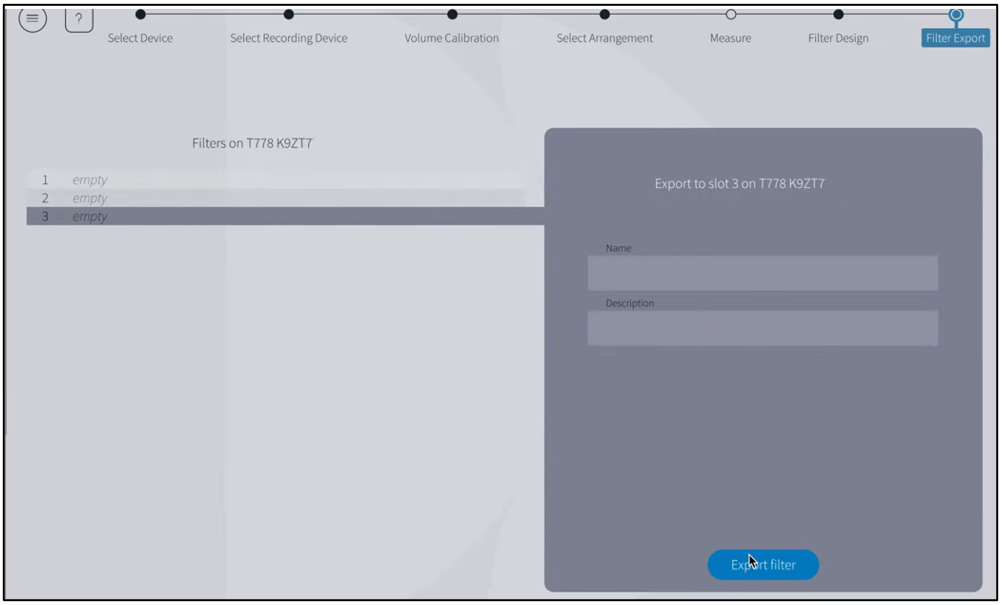
30. Click Export filter to save the filter to the NAD product. The NAD products' front panel displays – Saving Filter. The Dirac Live application returns to the Filter Design screen.


")